A Practical Guide to checkm8
It’s been almost three and half months since independent researcher axi0mX has made public the groundbreaking “checkm8” exploit. Our recent blog, “iOS Breakthrough Enables Lawful Access for Full File System Extraction”, provided an introduction to the basics. In this blog, we’ll focus on the forensic use of checkm8 and introduce the first comprehensive implementation of the exploit in the digital forensics world, provided in the Cellebrite UFED solution.
How Digital Forensics Currently Uses checkm8 and checkra1n
The first use of checkm8 in forensics started shortly after November 10th, when a group of researchers released the first jailbreak to utilize the checkm8 exploit, named checkra1n. This new jailbreak was quickly adopted and used by examiners to get file system extractions from ‘jailbroken’ iOS devices.
To use checkra1n, some devices required installation of additional services, such as Cydia or AFC2 (Apple File Conduit 2), while others worked directly using SSH protocol. checkra1n was a great achievement however its introduction had little impact on the majority of examiners for main three reasons:
- Jailbreak-based methods are considered to be ‘less’ forensically sound
- The examiner needed a macOS workstation to apply the 3rd party checkra1n tool
- Under the time-sensitive schedule of the examiner, the multi-stage (and sometimes error-prone) process made it less appealing
UFED 7.28 Allows checkm8 To Do Full File System Extractions
In order to benefit from the checkm8 exploit, typical examiners expect an easy-to-use, all-in-one solution, tried and tested by experts. This is why Cellebrite introduced UFED 7.28—a new UFED version that fully integrates checkm8. (The solution is available in Cellebrite’s UFED 4PC and Touch 2 platforms.)
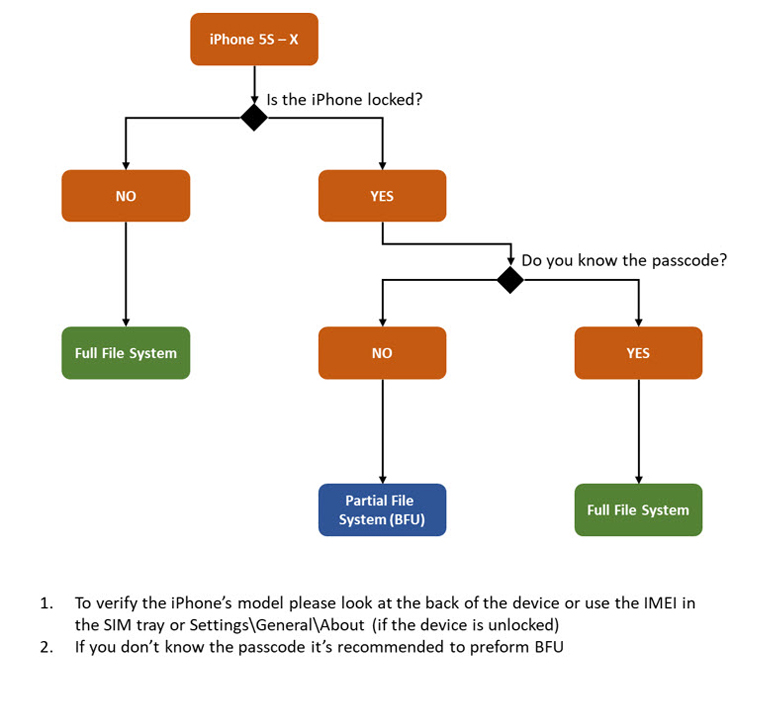
UFED now supports full file system extractions, which also include the keychain extraction from unlocked iOS devices (known passcode or none set), and a partial file system (Before-First-Unlock) from locked devices with an unknown passcode. The table below shows the supported devices and iOS versions:
Supported devices and iOS versions – UFED 7.28
| Device (SoC) | Minimum iOS version | Latest iOS version* |
| iPhone 5S (A7) | 12.3 | 12.4.4 |
| iPhone 6 | iPhone 6 +(A8) | 12.3 | 12.4.4 |
| iPhone 6S | iPhone 6S + (A9) | 12.3 | 13.3 |
| iPhone SE (A9) | 12.3 | 13.3 |
| iPhone 7 | iPhone 7+ (A10) | 12.3 | 13.3 |
| iPhone 8 | iPhone 8+ (A11) | 12.3 | 13.3 |
| iPhone X (A11) | 12.3 | 13.3 |
In the future, the latest iOS-supported version will be updated on an ongoing basis.
In order to avoid confusion with the terms “full file system” and “partial file system” (BFU), and to clarify what can be done on each device using UFED, we suggest using the decision flow diagram below. For locked devices with an unknown passcode, contact Cellebrite for additional support.

How To Locate The New Method
For each device in the table above, we’ve added a new method (button) under Advanced Logical called “Full File System” (checkm8). Pressing on the button will lead you to a general instruction screen that will outline how to place the device into “Device Firmware Update” (DFU) mode.
Placing a device in DFU can prove to be a bit tricky, so follow the steps below for the iPhone versions listed. The “Continue” button will only be enabled if the device is in DFU. You can see if the attack is successful by looking at the iPhone screen to see if the Cellebrite iOS client appears.
DFU Guide
iPhone 5S | iPhone 6 | iPhone 6+ | iPhone 6S | iPhone 6S+ | iPhone SE
- Place the device in recovery mode. (The Apple iTunes logo should appear.)
- Press the “Power” button for three seconds.
- After three seconds simultaneously hold both the Power and “Home” buttons down for an additional 10 seconds.
- Release the Power button while holding the Home button for an additional five seconds.
- UFED “Continue” should now be enabled.
iPhone 7 | iPhone 7+
- Place the device in recovery mode. (The Apple iTunes logo should appear.)
- Simultaneously hold both the “Power” and “Volume-down” buttons down for 10 seconds.
- Release the Power button while holding the Volume-down button for an additional 10 seconds.
- UFED “Continue” should now be enabled.
iPhone 8 | iPhone 8+ | iPhone X
- Place the device in recovery mode. (The Apple iTunes logo should appear.)
- In the recovery screen, short-press the “Volume-up” button.
- Short-press the “Volume-down” button.
- Press and hold the “Side” button until the screen completely turns off.
- Simultaneously press and hold both the Side and Volume-down buttons for five seconds.
- Release the Side button while holding the Volume-down button for an additional 10 seconds.
- UFED “Continue” should now be enabled.
The Future of checkm8
The checkm8 path in UFED is only beginning. New OS versions may require additional research and development to support them; time will tell what amount of effort will be needed. In future versions, checkm8 may allow examiners to perform deep, “selective” extractions to directly extract specific applications or files, which will save valuable time during investigations.
The future looks exciting and here at Cellebrite we promise to keep delivering the best digital intelligence tools you’ve come to expect. Stay tuned.


